I have used Scrivener on Windows and Mac for five years and Scrivener for iOS for 1.5 years. Yet, I never considered activating Scrivener’s Typewriter Scrolling Mode – until now.
After all, I thought Scrivener’s Typewriter Scrolling was only used by 70- or 80-year old journalists, who were used to cranking out articles on their old Royal typewriters! Since I had all these fancy new gadgets such as screen touch capability, a trackpad, gestures and windows with scroll bars, who needed Scrivener’s Typewriter Scrolling?
The Problem
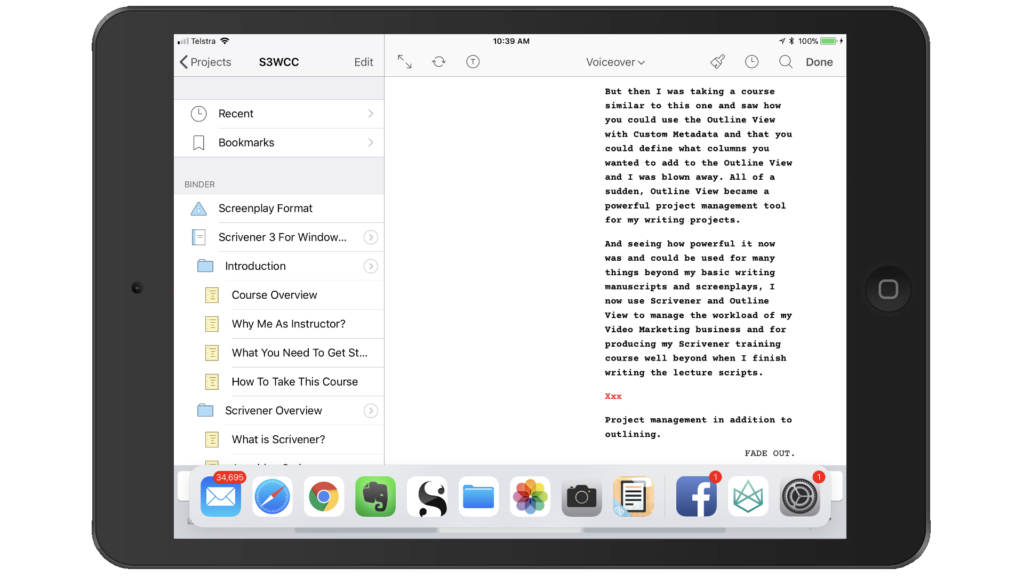
This changed though with using Scrivener on my iPad when iOS 11 came out several months ago. iOS 11 provides a great feature to raise the Dock by swiping up from the bottom of the screen. I use this all the time now with the Expanded Dock capabilities to work split-screen with Scrivener and other apps such as Evernote, Word, Photos and Files. However, when I am power-typing new content, which I have been the last few days, my cursor and typing area was always ending up at the bottom of the screen. And when I go to adjust the cursor to a new position to make an edit, I often inadvertently was bringing up the Dock. But now it was in the way, and took a couple of actions to remove it and get back to typing. This was becoming quite a distraction!
Typing at the bottom of the screen was becoming a real pain.
Activating Scrivener’s Typewriter Scrolling Mode as the Solution
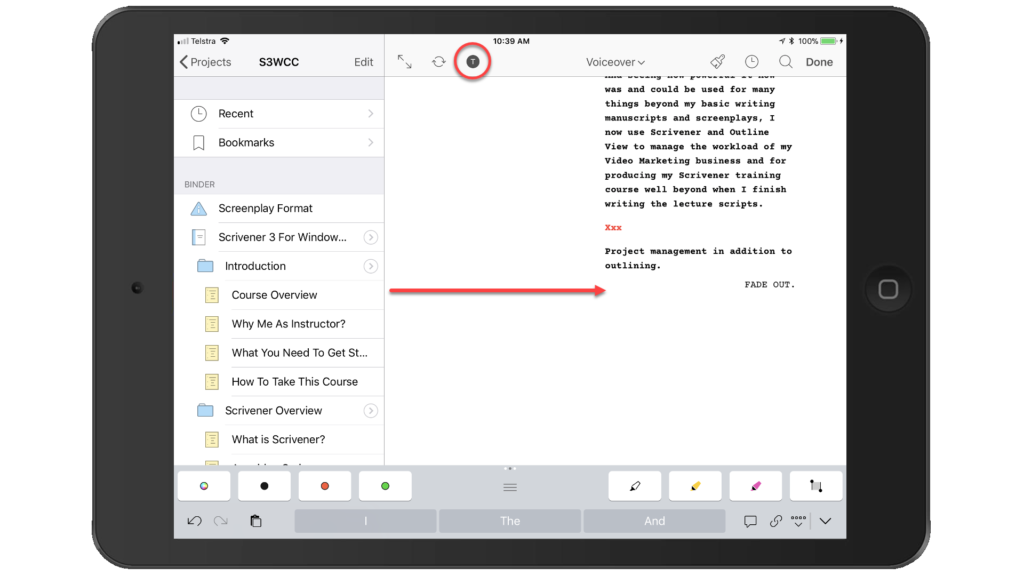
So for the first time ever, I activated Scrivener’s Typewriting Scrolling Mode and what relief it provided! To activate it, just tap on the ‘T’ in the circle at the top of the Editor. (And if you wish to turn off Scrivener’s Typewriter Scrolling Mode, just tap on the ‘T’ again.)

Now the cursor is positioned in the middle of the screen (or wherever you set Scrivener’s Typewriter Scrolling to be positioned). This allowed me to type and type some more and easily move my cursor around the recently typed area to make edits. No more iOS Dock being inadvertently in the way, no more running off the screen and missing where I was tapping. I was positioned right in the middle of the Editor and focused on writing! And this, I realized was the intent behind Scrivener’s Typewriter Scrolling in the first place!
Scrivener’s Typewriter Scrolling Mode Settings for iOS
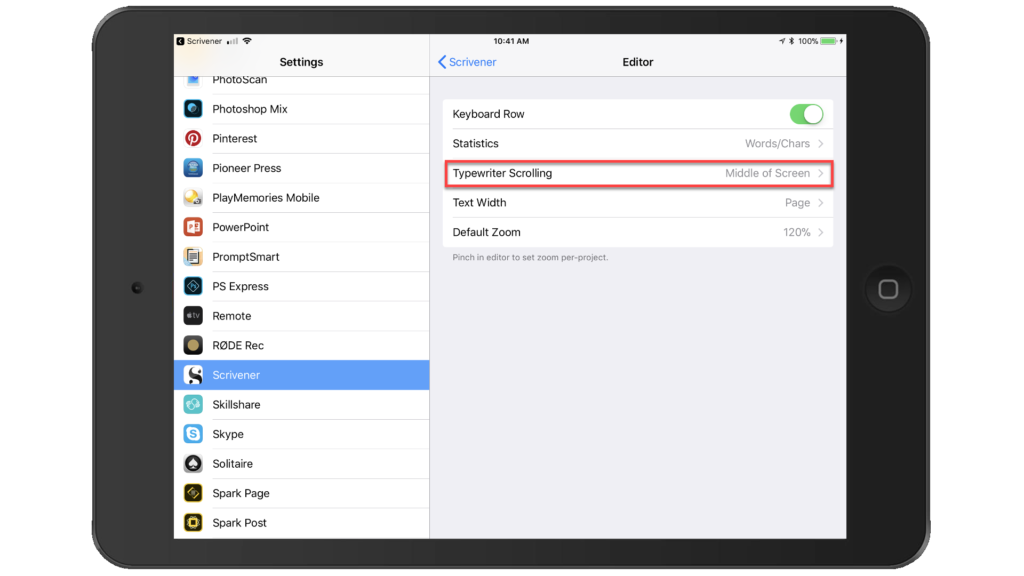
Scrivener’s Typewriter Scrolling Mode is always available. Just tap on the ‘T’ as shown above to activate it. However, where you position Scrivener’s Typewriter Scrolling Mode is set in Scrivener’s App-Wide settings. Go to Settings, then Scrivener, the Editor, then Typewriter Scrolling to set the position where you want the cursor to stay positioned. I prefer the ‘Middle of Screen’ for the reasons I mentioned above. However, you can also set it to:
- Top Quarter of Screen
- Top Third of Screen
- Middle of Screen
- Bottom Third of Screen
Scrivener’s Typewriter Scrolling Mode on Desktop
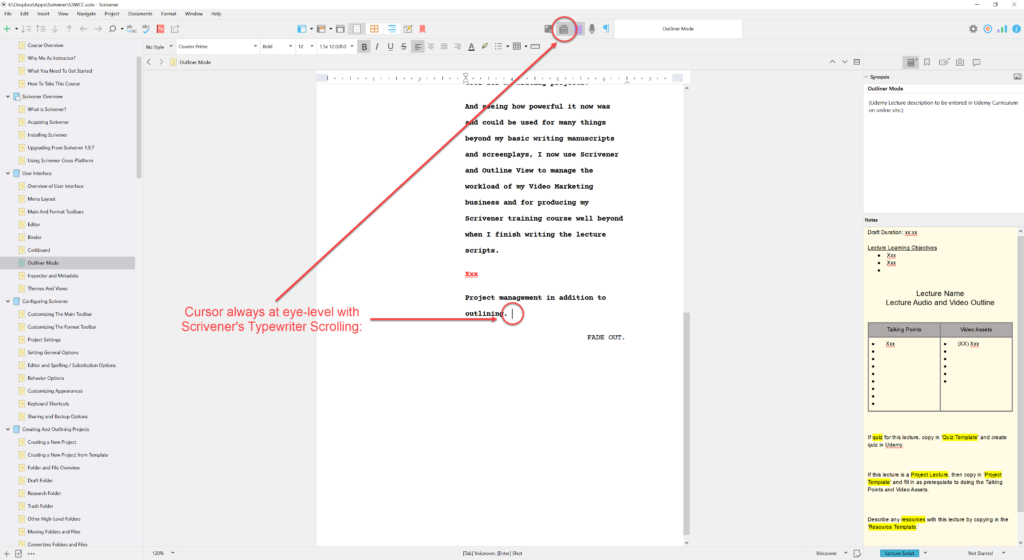
Since the experiment was so successful for power-typing on my iPad, I decided to try Scrivener’s Typewriting Scrolling Mode on my desktop. I have a 28-inch 4K monitor, so always typing at the bottom of the Scrivener Editor would seem to be less of a problem since I could type a long time before reaching the bottom! Additionally, I do not have a touch monitor, so I never had to worry about accidentally tapping something on the Dock or Task Bar. Yet, now being curious and please with the results when using it on my iPad, I decided to give it a try on desktop Scrivener.
And Scrivener’s Typewriter Scrolling Mode provided benefits in new ways, the biggest being ergonomically. With a big screen, I was previously sometimes working at the top of it and bending my neck backwards to view where the cursor was. Or I was typing at the bottom of the screen and leaning forward and craning my neck to view the bottom. But with Scrivener’s Typewriter Scrolling Mode, it was “hey diddle, diddle – right in the middle!” My posture was improved, with my back firmly resting against my chair and my head always positioned properly! The physical strain of working at my desk had significantly reduced!
Summary
Scrivener’s Typewriter Scrolling Mode is far more useful than I thought it would be. It is a lifesaver when power-typing on the iPad with iOS 11 and its new Expanded Dock capability. It also provided ergonomic benefits using my Windows desktop and laptop. Now that I have been using it for a week, I am not sure how I ever got by without it over the last 5 years! Scrivener’s Typewriter Scrolling Mode is now always on!
Do you want to learn more about using Scrivener for iOS? Feel free to preview and enroll in our 3- hour Scrivener for iOS training course on Udemy. Nine new lectures have recently been added on how to use Scrivener with iOS 11 and the Expanded Dock capability and split-screen mode, and on using the new iOS 11 Files App with Scrivener. If you do sign up for the course, you are provided lifetime access and will continue to receive new lectures as they are released. This course now provides 3 full hours of training on how to use Scrivener for iOS! Click here to get the lowest price possible!
And check out our newly launched Scriptwriting with Scrivener course. Scriptwriting is so much fun and so useful for more than just writing screenplays for feature films or stage plays. it can be used for comic books, gaming scenarios, author and book trailers and promotions and training courses. Click here to get it at the lowest price possible!
Steve Shipley, author and trainer
© 2018. InkIT Publishing. All rights reserved.
Scrivener for iOS Training
Scriptwriting with Scrivener Training
InkIT Publishing on Facebook
Twitter: InkIT Publishing @inkitpub; Steve Shipley @shipleyaust


Anne Rainbow on January 23, 2018 at 6:41 pm said:
Thanks Steve. I too had never played with this feature, until today, having read your blog. The ergonomic argument is a winner for me. At my standing desk, having the cursor in the ‘right’ place for my eyeline will help enormously. Thanks!